Monday 22 July 2019

GPO - Setting Missing, Only All Settings Folder Is Available

A few weeks ago, we faced an issue where all of our GPOs were broken (kind of....). It seems although the GPOs were editable, but the settings were not there... What we see was :


Description :
GPO gone bad.....

Issue :

  1.  Launch GPMC | Edit a policy, expand to Computer Config | Policies | Administrative Templates, all settings are missing. However, each config line could be found inside All Settings

  2.  If we look carefully, the policy is retrieved from the central store.


  3.  if we look at other domain (other domain, not other Domain Controller), the policy is retrieved from the local computer.


Troubleshooting : 
  1. Open Windows Explorer, navigate to \\<DomainName>\SYSVOL\<DomainName>\Policies. There is a folder called PolicyDefinitions 


  2.  Within the folder, there is nothing, no folders no files.....


Resolution : 
  1.  Open Windows Explorer, navigate to \\<DomainControllerName>\c$\Windows\PolicyDefinitions. Copy all contents there....


  2.  ... and paste them to \\<DomainControllerName>\c$\Windows\SYSVOL\sysvol\<DomainName>\Policies\PolicyDefinitions. You may need to wait for x minutes for replication to complete (depending on your replication time).


  3.  Once done, try to edit any GPO, it should be working fine now...

    Share:

    Monday 11 March 2019

    Unable to Log In to Visual Studio

    Recently, one of my users complaining because they he could not activate Visual Studio with his MSDN account. It works fine on another machine, but not his. I tried mine, and I still got the same error - thus it was safe to rule out it is not license / user issues, but more towards computer issue.


    Error :

    Microsoft Visual Studio
    We could not add the account
    Service returned error. Check InnerException for more details


    Troubleshooting :

    1. Back to basic - let's start from beginning... Trying to sign in will throw this error window.

    2. Selecting Close on above window would throw this Security Alert warning.


    3.  Selecting View Certificate on above window would give us this.


    4.  Let's view Certification Path, and view Root CA certificate by selecting the root certificate in Certification path | View Certificate


    5.  So it seems the Root CA (in my case) is issued by Baltimore CyberTrust Root.


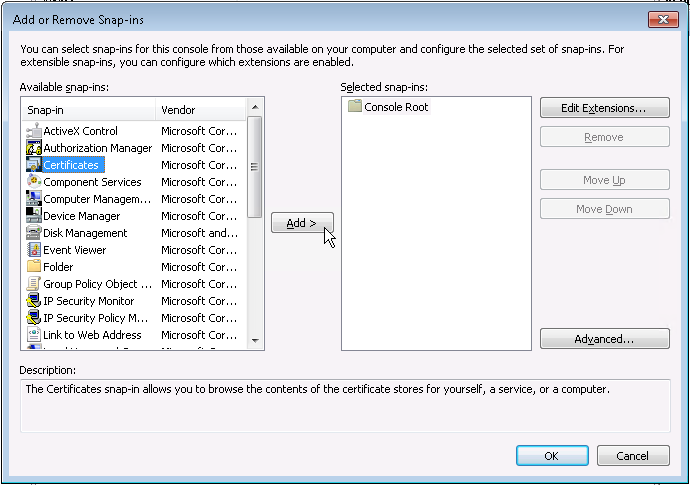
    6.  Do I have that on that machine? Let see... Launch Microsoft Management Console by going to Run | type MMC | press Enter. Select File | Add/Remove Snap-in...


    7.  Choose Certificate | Add > 


    8.  Select Computer account | Next >


    9.  Select Local computer | Finish


    10.  Select OK


    11.  Browse to Console Root | Certificate | Trusted Root Certification Authorities | Certificates. On right column..... oh no! Baltimore CyberTrust Root certificate was not there!


    Resolution :

    1. Now let's install the cert! download the CA (in my case, I downloaded from here : https://www.telesec.de/en/serverpass-en/support/download-area/category/72-baltimore-cybertrust-root ).

       
    2.  At the same MMC console, right click at Certificate | All Tasks | select Import...


    3.  Select Next >


    4.  Browse to the CA file | select Next >


    5. Place the cert on below store | select Next >
      Store : Trusted Root Certification Authorities


    6.  Select Finish


    7.  Select OK


    8.  Refresh the console, then we could see the cert is now installed.


    9. Tried to sign in again, we shall now pass!
    Share:

    Friday 8 March 2019

    Unable to Patch Server - Access is Denied


    I faced this issue a few months back, where I could not patch one of our servers. Whenever I tried, I will got this :


    Error : 
    Windows Update Standalone Installer

    Installer encountered an error :  0x80070005

    Access is denied.


    Troubleshooting :

    Troubleshooting 101 - check the service. Turned out, Windows Update service could not be found in the server...


    Resolution :

    There are 2 easy ways to resolve this....


    Method 01 :
    1) Go to a working server.
    2) launch REGEDIT.
    3) export below Registry key.
    Registry key : HKEY_LOCAL_MACHINE\SYSTEM\CurrentControlSet\Services\wuauserv
    4) import to the target server
    5) restart the server


    Method 02 : 

    1) Apply below Registry Keys to the server :


    [HKEY_LOCAL_MACHINE\SYSTEM\CurrentControlSet\Services\wuauserv]
    "PreshutdownTimeout"=dword:036ee800
    "DisplayName"="Windows Update"
    "ErrorControl"=dword:00000001
    "ImagePath"=hex(2):25,00,73,00,79,00,73,00,74,00,65,00,6d,00,72,00,6f,00,6f,00,\
      74,00,25,00,5c,00,73,00,79,00,73,00,74,00,65,00,6d,00,33,00,32,00,5c,00,73,\
      00,76,00,63,00,68,00,6f,00,73,00,74,00,2e,00,65,00,78,00,65,00,20,00,2d,00,\
      6b,00,20,00,6e,00,65,00,74,00,73,00,76,00,63,00,73,00,00,00
    "Start"=dword:00000002
    "Type"=dword:00000020
    "Description"="@%systemroot%\\system32\\wuaueng.dll,-106"
    "DependOnService"=hex(7):72,00,70,00,63,00,73,00,73,00,00,00,00,00
    "ObjectName"="LocalSystem"
    "ServiceSidType"=dword:00000001
    "RequiredPrivileges"=hex(7):53,00,65,00,41,00,75,00,64,00,69,00,74,00,50,00,72,\
      00,69,00,76,00,69,00,6c,00,65,00,67,00,65,00,00,00,53,00,65,00,43,00,72,00,\
      65,00,61,00,74,00,65,00,47,00,6c,00,6f,00,62,00,61,00,6c,00,50,00,72,00,69,\
      00,76,00,69,00,6c,00,65,00,67,00,65,00,00,00,53,00,65,00,43,00,72,00,65,00,\
      61,00,74,00,65,00,50,00,61,00,67,00,65,00,46,00,69,00,6c,00,65,00,50,00,72,\
      00,69,00,76,00,69,00,6c,00,65,00,67,00,65,00,00,00,53,00,65,00,54,00,63,00,\
      62,00,50,00,72,00,69,00,76,00,69,00,6c,00,65,00,67,00,65,00,00,00,53,00,65,\
      00,41,00,73,00,73,00,69,00,67,00,6e,00,50,00,72,00,69,00,6d,00,61,00,72,00,\
      79,00,54,00,6f,00,6b,00,65,00,6e,00,50,00,72,00,69,00,76,00,69,00,6c,00,65,\
      00,67,00,65,00,00,00,53,00,65,00,49,00,6d,00,70,00,65,00,72,00,73,00,6f,00,\
      6e,00,61,00,74,00,65,00,50,00,72,00,69,00,76,00,69,00,6c,00,65,00,67,00,65,\
      00,00,00,53,00,65,00,49,00,6e,00,63,00,72,00,65,00,61,00,73,00,65,00,51,00,\
      75,00,6f,00,74,00,61,00,50,00,72,00,69,00,76,00,69,00,6c,00,65,00,67,00,65,\
      00,00,00,53,00,65,00,53,00,68,00,75,00,74,00,64,00,6f,00,77,00,6e,00,50,00,\
      72,00,69,00,76,00,69,00,6c,00,65,00,67,00,65,00,00,00,00,00
    "FailureActions"=hex:00,00,00,00,01,00,00,00,01,00,00,00,03,00,00,00,14,00,00,\
      00,01,00,00,00,60,ea,00,00,00,00,00,00,00,00,00,00,00,00,00,00,00,00,00,00
    "Group"=""
    [HKEY_LOCAL_MACHINE\SYSTEM\CurrentControlSet\Services\wuauserv\Parameters]
    "ServiceDllUnloadOnStop"=dword:00000001
    "ServiceMain"="WUServiceMain"
    "ServiceDll"=hex(2):25,00,73,00,79,00,73,00,74,00,65,00,6d,00,72,00,6f,00,6f,\
      00,74,00,25,00,5c,00,73,00,79,00,73,00,74,00,65,00,6d,00,33,00,32,00,5c,00,\
      77,00,75,00,61,00,75,00,65,00,6e,00,67,00,2e,00,64,00,6c,00,6c,00,00,00
    [HKEY_LOCAL_MACHINE\SYSTEM\CurrentControlSet\Services\wuauserv\Security]
    "Security"=hex:01,00,14,80,78,00,00,00,84,00,00,00,14,00,00,00,30,00,00,00,02,\
      00,1c,00,01,00,00,00,02,80,14,00,ff,00,0f,00,01,01,00,00,00,00,00,01,00,00,\
      00,00,02,00,48,00,03,00,00,00,00,00,14,00,9d,00,02,00,01,01,00,00,00,00,00,\
      05,0b,00,00,00,00,00,18,00,ff,01,0f,00,01,02,00,00,00,00,00,05,20,00,00,00,\
      20,02,00,00,00,00,14,00,ff,01,0f,00,01,01,00,00,00,00,00,05,12,00,00,00,01,\
      01,00,00,00,00,00,05,12,00,00,00,01,01,00,00,00,00,00,05,12,00,00,00
    [HKEY_LOCAL_MACHINE\SYSTEM\CurrentControlSet\Services\wuauserv\TriggerInfo]
    [HKEY_LOCAL_MACHINE\SYSTEM\CurrentControlSet\Services\wuauserv\TriggerInfo\0]
    "Type"=dword:00000005
    "Action"=dword:00000001
    "Guid"=hex:e6,ca,9f,65,db,5b,a9,4d,b1,ff,ca,2a,17,8d,46,e0
    [HKEY_LOCAL_MACHINE\SYSTEM\CurrentControlSet\Services\wuauserv\TriggerInfo\1]
    "Type"=dword:00000005
    "Action"=dword:00000001
    "Guid"=hex:c8,46,fb,54,89,f0,4c,46,b1,fd,59,d1,b6,2c,3b,50


    2) Outcomes...


    3) Restart server once done


    4) Windows Update service is visible now.


    Share:

    Thursday 1 February 2018

    Microsoft Outlook Signature : Location of the File

    Another simple post - Where is the location of Outlook Signature ? It is at........

    C:\Users\<UserID>\AppData\Roaming\Microsoft\Signatures


    So there are 3 files : 

    *.htm - for HTML email format
    *.rtf - for Rich Text email format
    *.txt - for plain Text email format


    all of them can be edited via Microsoft Word. simple as, aye?
    Share:

    Thursday 25 January 2018

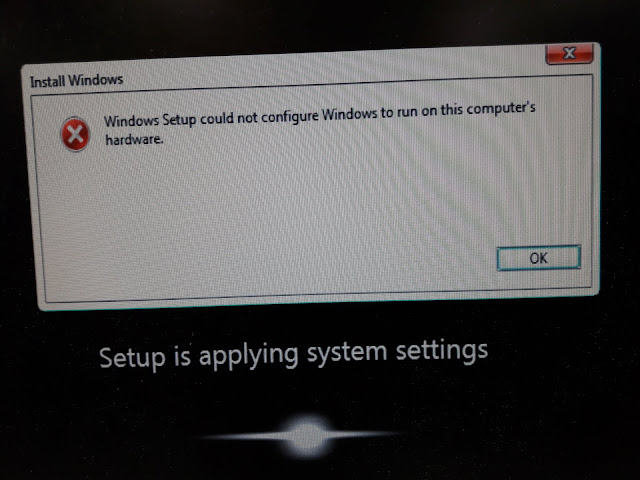
    Windows OS Deployment : Windows setup could not configure Windows to run on this computer's hardware.

    I got this error while deploying Windows OS to my environment. It should be straightforward process, but somehow I got stuck with this. Clicking OK will restart the machine, and it still won't resolve the issue. Workaround? run msoobe.exe manually.


    Issue : 
    Windows setup could not configure Windows to run on this computer's hardware.


    Workaround :
    1.  Press Shift + F10, command prompt window will opened


    2.  Change the directory to C:\Windows\System32\oobe
      CMD :
      cd C:\Windows\System32\oobe


    3.  execute msoobe.exe
      CMD : msoobe or msoobe.exe


    4.  This screen appeared. Proceed with deployment.


    5.   Once all done, we'll be back to this screen, restart the machine by using command prompt or just click OK at the message box.


    Share:

    Thursday 18 January 2018

    Thursday 11 January 2018

    How To : Group Policy Processing ( GPP ) : Add / Edit / Remove INI FIle

    It is a common practice for applications to have configurations set in INI file. It may contain information such as language, key, connection setting, version, and so forth. Updating INI file might not affect the application coding, but it may affect on how the application behave. There are multiple ways to update the file, one of it is by using Group Policy Preference ( GPP ). 

    In this example, I want to update a key file at a specific location with a specific information.

    Information : 

    • File Location : C:\Temp\key\keyfile.key
    • Content of AppsKey.key :
              [Setup]
              Key=XXXX-XXXX-XXXX-XXXX


    As mentioned by Microsoft here, below format must be followed :
    [SectionName]
    PropertyName1=PropertyValue1
    PropertyName2=PropertyValue2

    How To Do :

    1.  Edit the policy. Navigate to Preference | Windows Settings


    2.  Right click INI Files | New | Ini File


    3.  This screen will appear...


      Action = Different action will do different thing. Refer to the table below
      File Path = where to put the file. If the folder does not exist, the folder will be created. If the file does not exist, the file will be created. If the file exists, the action will affect the INI file content.
      SectionName = In which section the key will resides
      PropertyName = the property of the key
      PropertyValue = value of the key

    4. Therefore...
      Action = Replace
      File Path = C:\Temp\key\keyfile.key
      SectionName = Setup
      PropertyName = ApplicationKey
      PropertyValue = XXXX-XXXX-XXXX-XXXX


    5.  If there are more keys needed, create more entries. Note that, Update and Replace will give the same result.


    Share: