Showing posts with label Microsoft. Show all posts

Wednesday 25 September 2019

Microsoft Assessment and Planning (MAP) Toolkit - Extract Report (3/4)

As mentioned in the first post, this KB series is about Microsoft Assessment and Planning (MAP) Toolkit. There are 4 main steps :
Once inventory data collected, we can generate reports. From the inventory data collected earlier, we can use options in the toolkit to generate the report.

For this example, we re going to discover Windows 10 Readiness

This KB is about how to generate report from collected inventory data.


  1. At Overview page, select the targeted scenario category. In this example, it is Desktop.


  2. At this page, select specific scenario that we after. In this example, it is Windows 10 Readiness.

     
  3.  It is possible to customize assessment properties. The properties will set the threshold of the assessment, such as, threshold for minimum CPU speed, acceptable free disk, as well as minimum assigned RAM. To do so, select Customize assessment properties option.


  4. You can use default settings by Microsoft, or use custom settings. Once done, select Run Assessment


  5.  Assessing….


  6.  Assessment completed, select Close.


  7.  Next, select Generate Windows 10 Readiness Report option


  8.  Report generated. Select Close


  9. The report (by default) saved in Documents\MAP\MAPToolkitDB folder. You can navigate there, or go to View | Saved Reports
    Note : if you launch MAP Toolkit by impersonating other account with Local Administrator Right, the report saved in that account’s Document’s folder.


  10. Open the report


Share:

Saturday 21 September 2019

Microsoft Assessment and Planning (MAP) Toolkit - Collect Inventory Data (2/4)


As mentioned in previous post, this KB series is about Microsoft Assessment and Planning (MAP) Toolkit. There are 4 main steps :
  1. Install MAP Toolkit and its basic configuration
  2. Collect inventory Data 
  3. Extract Report
  4. Extract Advanced Report

Before we could generate a report, we need to collect inventory data. There are a few options, such as Windows computers, Linux computers, computers on VMware, Active Devices and users, etc.

For this example, we re going to discover Windows Computers within a specific IP ranges.

This KB is about how to collect inventory data.


  1. At Overviews section, select Perform an inventory

  2. For this testing, let’s select Microsoft computers, and select Next

  3. For this testing, we will discover devices via IP range. Select scan an IP address range, and select Next

  4. Specify range if IPs, and select Next

  5. To discover and connect to the machines, we need to provide user account(s) that have permission to do so. Select Create…

  6. Supply the credential, and select Save

  7. Select Next

  8. Select Next

  9. View the summary. If they are all good, select Finish

  10. Discovering… you can close the window if you want to.

  11. Discovery process completed. Select Close.


Share:

Wednesday 18 September 2019

Microsoft Assessment and Planning (MAP) Toolkit - Install MAP Toolkit and its basic configuration (1/4)

As mentioned in previous post, this KB series is about Microsoft Assessment and Planning (MAP) Toolkit. There are 4 main steps :
  1. Install MAP Toolkit and its basic configuration
  2. Collect inventory Data 
  3. Extract Report
  4. Extract Advanced Report


This KB is about how to install MAP Toolkit and its basic configuration


  1. Launch the installer with Administrator privilege


  2. Select Next on the welcome screen
  3. Accept the agreement and select Next
  4. Configure installation path, and select Next
  5. Ready to install. Select Install
  6. Installing…
  7. Select Finish
  8. Launch the app
  9. MAP launched. DB needs to be set up prior to use the toolkit
  10. Connection to inventory database needs to be created. Give it a name, and select OK.
    Note that by default, the data source name is LocalDB (MAPToolkit)
  11. Overview page of MAP. Step completed.
Share:

Microsoft Assessment and Planning (MAP) Toolkit - Overview

Microsoft created a  toolkit called Microsoft Assessment and Planning Toolkit that helps IT to discover current infrastructure for variety of migration projects. 

This tool kit covers below scenarios :
  • Windows computers
  • Linux/UNIX computers
  • VMware computers
  • Active Directory and Users
  • Exchange Servers
  • Endpoint Protection Server
  • Lync Server
  • Softwre ID (SWID) tags
  • SQL Server
  • SQL Server with Database Details
  • Microsoft Azure Platform Migration
  • Oracle
  • Windows Volume Licensing
  • Client Access Tracking for Windows Server 2012 or Later
  • Client Access Tracking for SQL Server 2012 or later
  • Client Access Tracking for Configuration Manager
  • Client Access Tracking for SharePoint Server 2016
  • Client Access Tracking for Remote Desktop Services


… and IT Admins can use below methods to discover the machines.
  • Use Active Directory Domain Service (AD DS)
  • Use Windows networking protocols
  • Use System Center Configuration Manager (SCCM)
  • Scan an IP Address range
  • Manually enter comptuer names and credentials
  • Import computer names from a file


This KB series will describe how to (you may click at the links to go to the pages):
  1. Install MAP Toolkit and its basic configuration
  2. Collect inventory Data
  3. Extract Report
  4. Extract Advanced Report

This toolkit can be downloaded here : https://www.microsoft.com/en-nz/download/details.aspx?id=7826


Note that for this testing, I am using Windows 10 + MS Excel 2016 + SQL Server Native Client 11 ( I will explain where to download this at series 4).

Share:

Thursday 25 January 2018

Windows OS Deployment : Windows setup could not configure Windows to run on this computer's hardware.

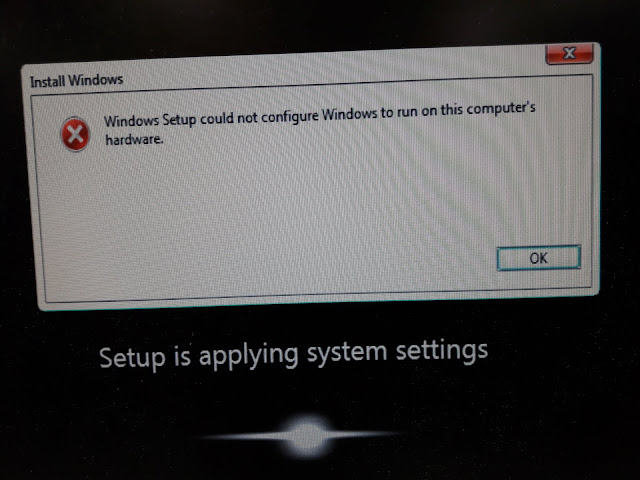
I got this error while deploying Windows OS to my environment. It should be straightforward process, but somehow I got stuck with this. Clicking OK will restart the machine, and it still won't resolve the issue. Workaround? run msoobe.exe manually.


Issue : 
Windows setup could not configure Windows to run on this computer's hardware.


Workaround :
  1.  Press Shift + F10, command prompt window will opened


  2.  Change the directory to C:\Windows\System32\oobe
    CMD :
    cd C:\Windows\System32\oobe


  3.  execute msoobe.exe
    CMD : msoobe or msoobe.exe


  4.  This screen appeared. Proceed with deployment.


  5.   Once all done, we'll be back to this screen, restart the machine by using command prompt or just click OK at the message box.


Share:

Thursday 15 September 2016

Group Policy Preference ( GPP ) : GPP Is Not Working, There Are Red and Green Dots / circle At The Settings

Group Policy Processing has been introduced since Server 2008, and Microsoft recommends to use GPP instead of normal GPO. To me, I prefer to use GPP as well, as it is more convenience to configure and troubleshoot. 

However, in some cases, the configuration may not get reflected, no matter how many times you perform gpupdate (gpupdate /force as well), or even reboot the machines. Your settings are all good, linked enabled to appropriate OU, Block Inheritance already enabled (to ensure policies assigned to parent OU not conflicting with your policies, just in case), there were no similar setting in Site and Domain policies, policies already being enforced (oh wait, do you really need to enforce?). 

What else could it be then? Oh wait, just before you planned to kill someone, you realized there were red dots / circles at the configurations, and those configurations (with red dots / circles ) were the one who drove you crazy! Configurations with green straight lines / circles were working as expected! 


So yes, it is how GPP works, actually. To simplify things, Microsoft (by default) disabled some configurations, so Administrators won't accidentally make changes. They need to enable those changes first, before the changes working as expected. In order to enable / disable those changes, one need to press :

  • F5 - Enable all configurations
  • F6 - Enable that specific configuration 
  • F7 - Disable that specific configuration 
  • F8 - Disable all configurations


To demonstrate some examples :


This is default configurations, some are enabled, some are not.


You pressed F5 (all enabled with green straight lines)


You pressed F8 (all enabled with red dots)


You clicked at some setting, and pressed F6 or F7 (pressing F6 will enable it, F7 will disable it)


Now we go to Advanced setting, to see on green / red circles.

We pressed F8.


We pressed F6 on some settings.


Share:

Thursday 8 September 2016

Failed to poll Now : Not enough server storage is available to process this command

A few weeks ago I went to AppSense training. It was very good, very informative and very intense - 5 days were not enough to be honest as it covers all 4 components of DesktopNow (AppSense Management Console, Performance Manager, Environment Manager, and Application Manager).

So back to the topic - I received this error while trying to pool the policy :
Failed to poll Now : Not enough server storage is available to process this command.


A bit digging, I managed to find why it happened, and how to resolve it. According to Microsoft :
"This issue may occur if the IRPStackSize registry entry on the server is set too low."


Now, what is IRPStackSize

According to Microsoft
The IRPStackSize parameter specifies the number of stack locations in I/O request packets (IRPs) that are used by Windows 2000 Server, by Windows Server 2003, and by Windows XP. You may have to increase this number for certain transports, for media access control (MAC) drivers, or for file system drivers. Each stack uses 36 bytes of memory for each receive buffer. 


or this explanation from Mark Perry might help: 
The IRPStackSize is a parameter that specifies the number of stack locations in I/O request packets (IRPs) that are used by the operating system. Each stack uses 36 bytes of memory for each receive buffer and you can increase the IRPStackSize, through the Windows registry for some transports, media access control (MAC) drivers, or for file system drivers. The default value of the IRPStackSize parameter is 15. On my Windows 7 PC, for whatever reason, it was set to 10. I creaded it to 20 and have not had an issue anymore.

Okay,  that's it - I don't really understand the cause ( T___T~) But to make it simple, it is because of the value specified in IRPStackSize parameter, which is too low. Perhaps if the value is too low, it caused the stack size to be limited, and file system cannot handle the request. My wild guess, do not quote me on that!


Issues :

Receive error when to perform Poll Now in ApPSense AMC.

Failed to poll Now : Not enough server storage is available to process this command.


Troubleshooting :


  1. RDP to the machine which having problem, launch REGEDIT

  2. Navigate to below path :
    Path :
    HKLM\SYSTEM\CurrentControlSet\Services\LanmanServer\Parameters

  3. A DWORD registry parameter with the name of 'IRPStackSize' is not available. Or if it is available, the value set is too small.


Resolution :

  1. Right click | New | choose DWORD value


  2. Rename it to below name. make sure to follow exactly the same, as it is case-sensitive.
    Name : IRPStackSize

  3. Once done, right click at it, and click at Modify


  4. Ensure the base changed to Decimal first before entering the value. The value should be 20 (or 14 in Hexadecimal).


  5. This is the output. Restart the machine

  6. Try to perform 'Poll Now' again once the machine came up from reboot. It should be working by now.
Share: