Showing posts with label Certificate Authority. Show all posts

Monday 11 March 2019

Unable to Log In to Visual Studio

Recently, one of my users complaining because they he could not activate Visual Studio with his MSDN account. It works fine on another machine, but not his. I tried mine, and I still got the same error - thus it was safe to rule out it is not license / user issues, but more towards computer issue.


Error :

Microsoft Visual Studio
We could not add the account
Service returned error. Check InnerException for more details


Troubleshooting :

  1. Back to basic - let's start from beginning... Trying to sign in will throw this error window.


  2. Selecting Close on above window would throw this Security Alert warning.


  3.  Selecting View Certificate on above window would give us this.


  4.  Let's view Certification Path, and view Root CA certificate by selecting the root certificate in Certification path | View Certificate


  5.  So it seems the Root CA (in my case) is issued by Baltimore CyberTrust Root.


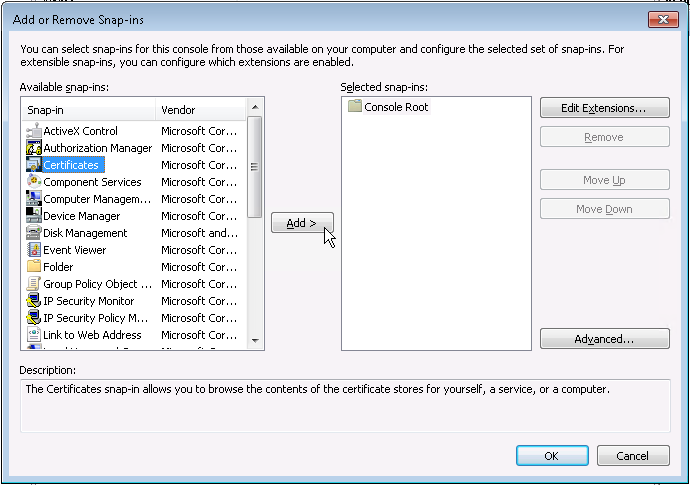
  6.  Do I have that on that machine? Let see... Launch Microsoft Management Console by going to Run | type MMC | press Enter. Select File | Add/Remove Snap-in...


  7.  Choose Certificate | Add > 


  8.  Select Computer account | Next >


  9.  Select Local computer | Finish


  10.  Select OK


  11.  Browse to Console Root | Certificate | Trusted Root Certification Authorities | Certificates. On right column..... oh no! Baltimore CyberTrust Root certificate was not there!


Resolution :

  1. Now let's install the cert! download the CA (in my case, I downloaded from here : https://www.telesec.de/en/serverpass-en/support/download-area/category/72-baltimore-cybertrust-root ).

     
  2.  At the same MMC console, right click at Certificate | All Tasks | select Import...


  3.  Select Next >


  4.  Browse to the CA file | select Next >


  5. Place the cert on below store | select Next >
    Store : Trusted Root Certification Authorities


  6.  Select Finish


  7.  Select OK


  8.  Refresh the console, then we could see the cert is now installed.


  9. Tried to sign in again, we shall now pass!
Share:

Wednesday 3 May 2017

Configure HTTPS authentication to CA Server

In previous post, I demonstrated steps to install a Certificate Authority server as well as enabling Web enrollment. All good so far. However, when we tried to proceed with web enrollment, below message box appeared :

In order to complete certificate enrollment, the Web site for the CA must be configured to use HTTPS authentication.


To make it worst (not really), if we tried to access to the web page by using HTTPS, no page can be displayed. 

Luckily, Microsoft has compiled all needed steps on how to get it resolved, as posted here.
Implementing SSL on a Web site in the domain with an Enterprise CA
The following example will assume that you have an Enterprise CA from which to issue certificates. Further, the assumption is that you have a Certification Authority Web Enrollment pages installed, either on that CA or on another computer in the domain. This example will walk through the steps necessary to do the following:
  1. Configure an appropriate certificate template for SSL certificates.
  2. Obtain a certificate for IIS using the certificate template
  3. Configure the HTTPS on the Default Web Site
  4. Connect to the HTTPS location for certificate enrollment


So, let's start with those steps.

1) Configure an appropriate certificate template for SSL certificates.
  1.  Launch Certificate Authority Console


  2.  Right click Certificate Templates | Manage


  3.  Certificate Templates Console will launch. Look for Web Server template, right click at it, and choose Duplicate Template


  4.  At Compatibility tab, you may want to maintain or change the settings depending on the environment.


  5.   Go to General tab, and change the name of the template to reflect correct usage. Change the certificate validity and renewal period if needed.


  6.  Go to Security tab, add 2 information :
    • User/Group Accounts which will be used in enrollment
    • Computer accounts which require ability to enroll


  7.   Go to Cryptography tab, make changes if needed. Once all good, click Apply then OK.


  8.  New template created. Close the Certificate Templates Console.


  9. At Certificate Authority Console, right click at Certificate Templates | New | Certificate Template to Issue. Find the newly created certificate templates, click on it, then click OK.


2) Obtain a certificate for IIS using the certificate template

  1.  Launch MMC console


  2.  Go to File | Add/Remove Snap-in...


  3.  Click at Certificate | Add >


  4.  Choose Computer account, and click Next >


  5.  Choose Local computer, then click Finish.


  6.  Click OK.


  7.  Expand certificate (Local Computer) | right click at Personal | Choose All Tasks | click at Request New Certificate


  8.  click Next.


  9.  Select Active Directory Enrollment Policy, then click next


  10. Click at ' More information is required to enroll for this certificate. Click here to configure settings. ' (coloured in blue).


  11.  We need to configure who will receive the certificate. In this case, the rootCA server. At Subject tab, at Subject name box, change the type to Common name, put in the value, and click Add >. Once done, click Apply then OK.


  12.  Click enroll.


  13.  Enrolling


  14.  Click Finish.


3) Configure the HTTPS on the Default Web Site

  1.  Launch IIS Manager


  2.  Navigate to Default Web Site (or if you have more, choose appropriately).


  3.  At Action column, click at Bindings...


  4.  Click at https, and click at Edit...


  5.  Change the SSL certificate to correct certificate (you can press View... to check to whom certificate is being issued)


  6.  Click OK.


  7.  Click Close.


4) Connect to the HTTPS location for certificate enrollment

  1.  launch the web enrollment with HTTPS. UID required, access the web using ID which previously configured.


  2.  This page will appeared if you try to access using unauthorized user ID.


  3.  Website launched successfully with HTTPS.
Share: