Showing posts with label GPMC. Show all posts

Monday 22 July 2019

GPO - Setting Missing, Only All Settings Folder Is Available

A few weeks ago, we faced an issue where all of our GPOs were broken (kind of....). It seems although the GPOs were editable, but the settings were not there... What we see was :


Description :
GPO gone bad.....

Issue :

  1.  Launch GPMC | Edit a policy, expand to Computer Config | Policies | Administrative Templates, all settings are missing. However, each config line could be found inside All Settings

  2.  If we look carefully, the policy is retrieved from the central store.


  3.  if we look at other domain (other domain, not other Domain Controller), the policy is retrieved from the local computer.


Troubleshooting : 
  1. Open Windows Explorer, navigate to \\<DomainName>\SYSVOL\<DomainName>\Policies. There is a folder called PolicyDefinitions 


  2.  Within the folder, there is nothing, no folders no files.....


Resolution : 
  1.  Open Windows Explorer, navigate to \\<DomainControllerName>\c$\Windows\PolicyDefinitions. Copy all contents there....


  2.  ... and paste them to \\<DomainControllerName>\c$\Windows\SYSVOL\sysvol\<DomainName>\Policies\PolicyDefinitions. You may need to wait for x minutes for replication to complete (depending on your replication time).


  3.  Once done, try to edit any GPO, it should be working fine now...

    Share:

    Monday 8 May 2017

    Citrix Group Policy Management Console

    It is a common practice to have a management server, with most (if not all) consoles installed on it. the purpose of this practice are to consolidate the management consoles into centralized servers, and reduce un-needed resources utilization on target servers (e.g : SQL, AppSense, Citrix Delivery Controller, VMware vCenter). 

    One component that I love to have in my management server is Citrix GPMC. I prefer to configure my Citrix policies via GPO, rather than Citrix Policies. One main reason is to consolidate all policies into a single, centralized location. 


    This is what you can see from AD server or normal servers/machines without Citrix GPMC installed / enabled.


    This is what you can see from Citrix servers with GPMC installed / enabled.


    Now, how to install Citrix GPMC : 

    1.  Download the installers from here :

      x86 : http://support.citrix.com/article/CTX142463#download

      x64 : http://support.citrix.com/article/CTX142464#download

    2.  Right click at the installer, and click Install (or just double click at it).


    3.  Preparing to install..


    4.  Accept the agreement, and click Install


    5.  Installing...


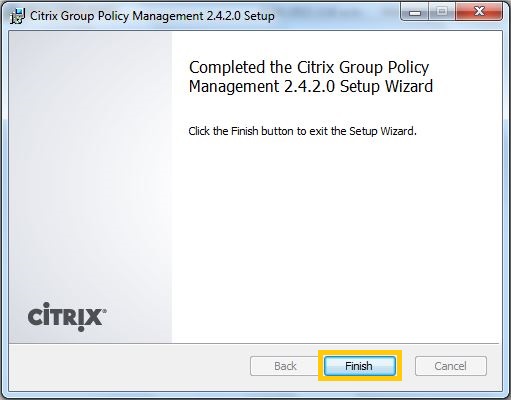
    6.  Done, click Finish.


    7.  Launch Group Policy Management, and Edit any GPO


    8.  Now we can see Citrix Policies available in GPO.

    Share:

    Thursday 15 September 2016

    Group Policy Preference ( GPP ) : GPP Is Not Working, There Are Red and Green Dots / circle At The Settings

    Group Policy Processing has been introduced since Server 2008, and Microsoft recommends to use GPP instead of normal GPO. To me, I prefer to use GPP as well, as it is more convenience to configure and troubleshoot. 

    However, in some cases, the configuration may not get reflected, no matter how many times you perform gpupdate (gpupdate /force as well), or even reboot the machines. Your settings are all good, linked enabled to appropriate OU, Block Inheritance already enabled (to ensure policies assigned to parent OU not conflicting with your policies, just in case), there were no similar setting in Site and Domain policies, policies already being enforced (oh wait, do you really need to enforce?). 

    What else could it be then? Oh wait, just before you planned to kill someone, you realized there were red dots / circles at the configurations, and those configurations (with red dots / circles ) were the one who drove you crazy! Configurations with green straight lines / circles were working as expected! 


    So yes, it is how GPP works, actually. To simplify things, Microsoft (by default) disabled some configurations, so Administrators won't accidentally make changes. They need to enable those changes first, before the changes working as expected. In order to enable / disable those changes, one need to press :

    • F5 - Enable all configurations
    • F6 - Enable that specific configuration 
    • F7 - Disable that specific configuration 
    • F8 - Disable all configurations


    To demonstrate some examples :


    This is default configurations, some are enabled, some are not.


    You pressed F5 (all enabled with green straight lines)


    You pressed F8 (all enabled with red dots)


    You clicked at some setting, and pressed F6 or F7 (pressing F6 will enable it, F7 will disable it)


    Now we go to Advanced setting, to see on green / red circles.

    We pressed F8.


    We pressed F6 on some settings.


    Share:

    Friday 4 September 2015

    Disabling drive mapping on Server 2008

    In previous post, I mentioned on how to disable drive mapping on Server 2003 via GPO. In this post, I will show on how to disable drive mapping on server 2008.

    Description :
    Disabling drive mapping on Server 2008


    How To Do :
    1.  Access to GPMC, edit the intended GPO. Browse to Computer Configuration > Policies > Administrative Templates > Windows Components > Remote Desktop Services > Remote Desktop Session Host > Device and Resource Redirection
    2. Click at ' Do not allow drive redirection '. That is our target setting
    3. Right click at it, and press Edit
    4.  Choose Enabled, press Apply and OK.
    5.  You can double confirm the setting by checking at ICA-TCP and RDP-TCP Properties. They are now checked, and grayed out.

    6. And this is the explanation by Microsoft on the GPO setting.

      Share:

      Friday 1 May 2015

      Disable Local Drive Mapping On Windows Server 2003

      This post will show on how to disable local drive mapping via GPO for Windows Server 2003 environment. Considering GPO will take precedence over Citrix policy, this setting will work on both RDP and ICA sessions.


      Description :
      Disable local drive mapping via GPO (the same setting can be applied to local policy too)


      How To Do :

      1. Open your Group Policy Object, and browse to this setting ( Computer Configuration > Administrative Templates > Windows Components > Terminal Services > Client/Server data redirection 


      2.  Let's focus on Do not allow drive redirection. Right click at it, and click at Properties


      3.  Choose Enabled, press Apply and OK.


      4.  This will be the outcome.


      5. This is the explanation on this setting by Microsoft.  


      6. Drive mapping is now disabled, and users are not able to change it.

      Share:

      Friday 17 April 2015

      Adding AD User Groups Into Computer Local Groups (Microsoft Server 2003)

      Description :
      There are multiple ways to do add AD user groups into computer local groups - manual way or using GPO. To me, it is always GPO way - it is easier (sort of) as the configuration will be persistent across all servers where the GPO being applied to.


      How To Do :

      1.  At your GPO, right click at it, and choose Edit...

      2.  Expand to Computer Configuration > Windows Settings > Security Settings > Restricted Groups. Right click at it, and choose Add Group...

      3.  Click at Browse... as we want to choose the AD user Group.

      4.  Type your AD User Group

      5.   Click at Check Names to ensure the group is correct. Once it is confirmed, click at OK.

      6. The User group will be listed here. You can choose as many user groups as you want, it will be listed here. Press OK again.

      7.  In here, click at the Add button under This group is a member of: option.

      8.  Click at Browse to choose the local group to be assigned to.

      9.  Type your desired local group name. In this example, I chose Remote Desktop User. As always, press Check Names, and OK once confirmed.

      10.  Press OK.

      11.  So the local group will be listed here. Press Apply and OK.

      12.  You can see a new entry listed in Restricted Groups option.

      13.  To ensure the policy enforced to the servers, RDP to the servers and run GPUPDATE /FORCE command

      14. You can see the AD user group will be listed in local Group.
      Share: