Wednesday 25 September 2019

Microsoft Assessment and Planning (MAP) Toolkit - Extract Report (3/4)

As mentioned in the first post, this KB series is about Microsoft Assessment and Planning (MAP) Toolkit. There are 4 main steps :
Once inventory data collected, we can generate reports. From the inventory data collected earlier, we can use options in the toolkit to generate the report.

For this example, we re going to discover Windows 10 Readiness

This KB is about how to generate report from collected inventory data.


  1. At Overview page, select the targeted scenario category. In this example, it is Desktop.


  2. At this page, select specific scenario that we after. In this example, it is Windows 10 Readiness.

     
  3.  It is possible to customize assessment properties. The properties will set the threshold of the assessment, such as, threshold for minimum CPU speed, acceptable free disk, as well as minimum assigned RAM. To do so, select Customize assessment properties option.


  4. You can use default settings by Microsoft, or use custom settings. Once done, select Run Assessment


  5.  Assessing….


  6.  Assessment completed, select Close.


  7.  Next, select Generate Windows 10 Readiness Report option


  8.  Report generated. Select Close


  9. The report (by default) saved in Documents\MAP\MAPToolkitDB folder. You can navigate there, or go to View | Saved Reports
    Note : if you launch MAP Toolkit by impersonating other account with Local Administrator Right, the report saved in that account’s Document’s folder.


  10. Open the report


Share:

Saturday 21 September 2019

Microsoft Assessment and Planning (MAP) Toolkit - Collect Inventory Data (2/4)


As mentioned in previous post, this KB series is about Microsoft Assessment and Planning (MAP) Toolkit. There are 4 main steps :
  1. Install MAP Toolkit and its basic configuration
  2. Collect inventory Data 
  3. Extract Report
  4. Extract Advanced Report

Before we could generate a report, we need to collect inventory data. There are a few options, such as Windows computers, Linux computers, computers on VMware, Active Devices and users, etc.

For this example, we re going to discover Windows Computers within a specific IP ranges.

This KB is about how to collect inventory data.


  1. At Overviews section, select Perform an inventory

  2. For this testing, let’s select Microsoft computers, and select Next

  3. For this testing, we will discover devices via IP range. Select scan an IP address range, and select Next

  4. Specify range if IPs, and select Next

  5. To discover and connect to the machines, we need to provide user account(s) that have permission to do so. Select Create…

  6. Supply the credential, and select Save

  7. Select Next

  8. Select Next

  9. View the summary. If they are all good, select Finish

  10. Discovering… you can close the window if you want to.

  11. Discovery process completed. Select Close.


Share:

Wednesday 18 September 2019

Microsoft Assessment and Planning (MAP) Toolkit - Install MAP Toolkit and its basic configuration (1/4)

As mentioned in previous post, this KB series is about Microsoft Assessment and Planning (MAP) Toolkit. There are 4 main steps :
  1. Install MAP Toolkit and its basic configuration
  2. Collect inventory Data 
  3. Extract Report
  4. Extract Advanced Report


This KB is about how to install MAP Toolkit and its basic configuration


  1. Launch the installer with Administrator privilege


  2. Select Next on the welcome screen
  3. Accept the agreement and select Next
  4. Configure installation path, and select Next
  5. Ready to install. Select Install
  6. Installing…
  7. Select Finish
  8. Launch the app
  9. MAP launched. DB needs to be set up prior to use the toolkit
  10. Connection to inventory database needs to be created. Give it a name, and select OK.
    Note that by default, the data source name is LocalDB (MAPToolkit)
  11. Overview page of MAP. Step completed.
Share:

Microsoft Assessment and Planning (MAP) Toolkit - Overview

Microsoft created a  toolkit called Microsoft Assessment and Planning Toolkit that helps IT to discover current infrastructure for variety of migration projects. 

This tool kit covers below scenarios :
  • Windows computers
  • Linux/UNIX computers
  • VMware computers
  • Active Directory and Users
  • Exchange Servers
  • Endpoint Protection Server
  • Lync Server
  • Softwre ID (SWID) tags
  • SQL Server
  • SQL Server with Database Details
  • Microsoft Azure Platform Migration
  • Oracle
  • Windows Volume Licensing
  • Client Access Tracking for Windows Server 2012 or Later
  • Client Access Tracking for SQL Server 2012 or later
  • Client Access Tracking for Configuration Manager
  • Client Access Tracking for SharePoint Server 2016
  • Client Access Tracking for Remote Desktop Services


… and IT Admins can use below methods to discover the machines.
  • Use Active Directory Domain Service (AD DS)
  • Use Windows networking protocols
  • Use System Center Configuration Manager (SCCM)
  • Scan an IP Address range
  • Manually enter comptuer names and credentials
  • Import computer names from a file


This KB series will describe how to (you may click at the links to go to the pages):
  1. Install MAP Toolkit and its basic configuration
  2. Collect inventory Data
  3. Extract Report
  4. Extract Advanced Report

This toolkit can be downloaded here : https://www.microsoft.com/en-nz/download/details.aspx?id=7826


Note that for this testing, I am using Windows 10 + MS Excel 2016 + SQL Server Native Client 11 ( I will explain where to download this at series 4).

Share:

Monday 22 July 2019

GPO - Setting Missing, Only All Settings Folder Is Available

A few weeks ago, we faced an issue where all of our GPOs were broken (kind of....). It seems although the GPOs were editable, but the settings were not there... What we see was :


Description :
GPO gone bad.....

Issue :

  1.  Launch GPMC | Edit a policy, expand to Computer Config | Policies | Administrative Templates, all settings are missing. However, each config line could be found inside All Settings

  2.  If we look carefully, the policy is retrieved from the central store.


  3.  if we look at other domain (other domain, not other Domain Controller), the policy is retrieved from the local computer.


Troubleshooting : 
  1. Open Windows Explorer, navigate to \\<DomainName>\SYSVOL\<DomainName>\Policies. There is a folder called PolicyDefinitions 


  2.  Within the folder, there is nothing, no folders no files.....


Resolution : 
  1.  Open Windows Explorer, navigate to \\<DomainControllerName>\c$\Windows\PolicyDefinitions. Copy all contents there....


  2.  ... and paste them to \\<DomainControllerName>\c$\Windows\SYSVOL\sysvol\<DomainName>\Policies\PolicyDefinitions. You may need to wait for x minutes for replication to complete (depending on your replication time).


  3.  Once done, try to edit any GPO, it should be working fine now...

    Share:

    Monday 11 March 2019

    Unable to Log In to Visual Studio

    Recently, one of my users complaining because they he could not activate Visual Studio with his MSDN account. It works fine on another machine, but not his. I tried mine, and I still got the same error - thus it was safe to rule out it is not license / user issues, but more towards computer issue.


    Error :

    Microsoft Visual Studio
    We could not add the account
    Service returned error. Check InnerException for more details


    Troubleshooting :

    1. Back to basic - let's start from beginning... Trying to sign in will throw this error window.


    2. Selecting Close on above window would throw this Security Alert warning.


    3.  Selecting View Certificate on above window would give us this.


    4.  Let's view Certification Path, and view Root CA certificate by selecting the root certificate in Certification path | View Certificate


    5.  So it seems the Root CA (in my case) is issued by Baltimore CyberTrust Root.


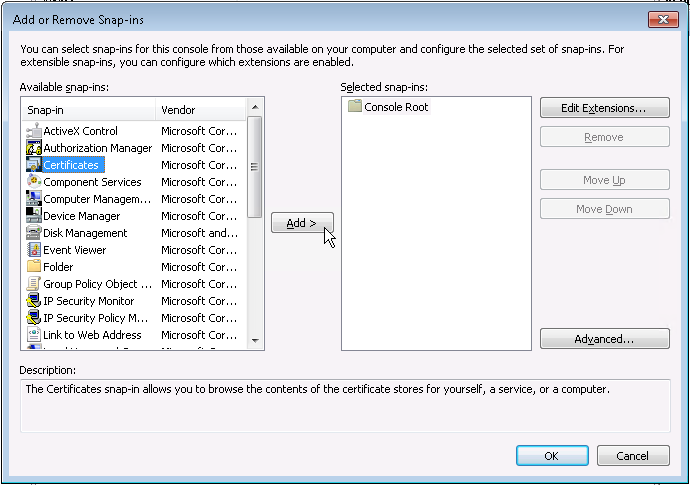
    6.  Do I have that on that machine? Let see... Launch Microsoft Management Console by going to Run | type MMC | press Enter. Select File | Add/Remove Snap-in...


    7.  Choose Certificate | Add > 


    8.  Select Computer account | Next >


    9.  Select Local computer | Finish


    10.  Select OK


    11.  Browse to Console Root | Certificate | Trusted Root Certification Authorities | Certificates. On right column..... oh no! Baltimore CyberTrust Root certificate was not there!


    Resolution :

    1. Now let's install the cert! download the CA (in my case, I downloaded from here : https://www.telesec.de/en/serverpass-en/support/download-area/category/72-baltimore-cybertrust-root ).

       
    2.  At the same MMC console, right click at Certificate | All Tasks | select Import...


    3.  Select Next >


    4.  Browse to the CA file | select Next >


    5. Place the cert on below store | select Next >
      Store : Trusted Root Certification Authorities


    6.  Select Finish


    7.  Select OK


    8.  Refresh the console, then we could see the cert is now installed.


    9. Tried to sign in again, we shall now pass!
    Share: